New response pads

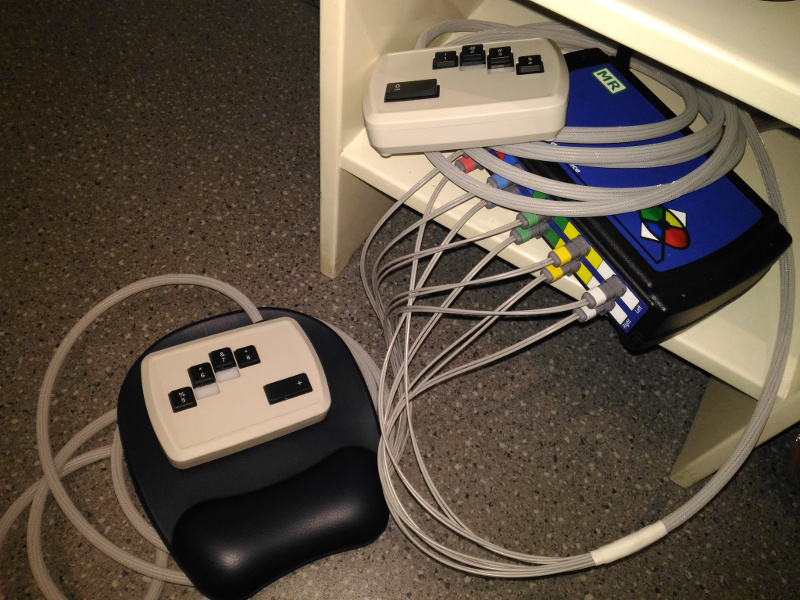
We recently purchased the VPixx ResponsePixx 10-button system to replace the Lumitouch pads which could not be repaired. But we chose not to get the VPixx pads and instead make our own so they would be easier to press, quieter, trigger earlier along the travel path, and be less expensive.

These new response pads are ready and are already being used in a few studies. They are where the Lumitouch pads used to be next to the MEG.

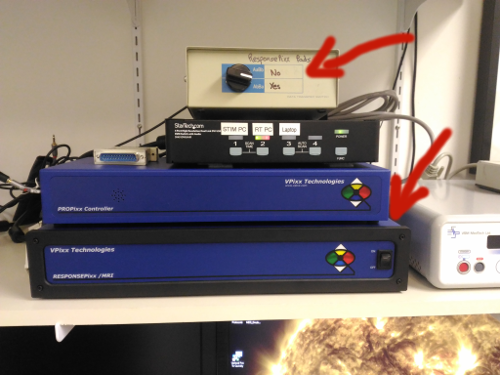
To use them, turn on the blue ResponsePixx Controller box next to the MEG Electronics Control Console, under the blue ProPixx projector controller box. Also make sure the switch on top points to “Yes”.
ResponsePixx_Box_Switch

The button signals follow a somewhat complicated path. A copy is now directly sent to the MEG in parallel port 1 (previously used by the StimPC). However only 8 buttons could be sent so I arbitrarily chose to remove the pinky buttons (keys 5 left and 4 right). The order on the port bits is fingers from left to right, i.e. keys 6, 7, 8, +, 0, 1, 2, 3. This records the exact button activity, with the signal staying high until the button is released.

A second copy of the signal goes to the ProPixx Controller so that it is accessible in the stimulus computer. This setup also allows having visual triggers (the projector “Pixel Mode”) as well as buttons sent from the ProPixx Controller to the MEG general digital IO port. However, this is not automatic. If your task runs in Matlab & PsychToolbox, you can interact with the buttons using the Datapixx interface. This is described in the next post. A few lines of code are required to enable the output of visual and button triggers to the MEG.

To make things easier, I made a function: c:\Toolboxes\SetButtonsAndPixelMode(Mode). There are 6 basic options for the ‘Mode’ input, and more can be added:

'Left'    % 5 left hand buttons & 8 bits from green pixel
'Right'   % 5 right hand buttons &  8 bits from green pixel
'Both'    % 4 fingers from each hand (no thumbs) & 8 bits from green pixel
'Full'    % all 10 buttons, no pixel
'Pixel'   % no buttons, 16 bits from red and green pixels
'Off'     % no buttons, no pixel

When buttons are output from the ProPixx Controller, they are always from left to right starting on pin 1. E.g. for the ‘Right’ mode, the right thumb is pin 1, for ‘Both’, the left pinky is pin 1 and the right index is pin 5 (i.e. 16 in the MEG trigger setup - I can help with that).

In many cases, including all the basic Mode settings above, only button presses will send triggers, but it is now also possible to send triggers on button releases with a custom Mode.

Matlab & Psychtoolbox usage - Updated

Basic usage of the buttons is shown in the file c:\Toolboxes\ButtonExample.m, copied below. In short, you first select which buttons to use with SetButtonsAndPixelMode, then check for responses with ButtonCheck.

% ResponsePixx buttons example.

% -----------------------------------------------------------------------------
% Before task

% Setup button mode.
SetButtonsAndPixelMode('Both');

% Start logging buttons
Datapixx('Open');
Datapixx('SetDinLog');
Datapixx('StartDinLog');
Datapixx('RegWrRd');

% Ensure desired visual settings
% Datapixx('DisablePropixxCeilingMount');
% Datapixx('DisablePropixxRearProjection');
% Datapixx('SetVideoMode', 0); % C24, Straight passthrough from DVI 8-bit RGB to VGA RGB.
% Datapixx('SetPropixxDlpSequenceProgram', 0); % 120 Hz regular sequence mode.
% % Datapixx('SetVideoBacklightIntensity', 1); % THIS IS NOT FOR THE PROJECTOR, DO NOT USE!

% -----------------------------------------------------------------------------
% During task

% Flush the button log before the part where you want to look for responses.
ButtonCheck;

% You can check at a specific point in the task.
pause(5);
ButtonData = ButtonCheck;
if ~isempty(ButtonData)
    % Do something with button data.
    fprintf('You pressed button %d, at time %d!', ButtonData(1, :));
else
    fprintf('You didn''t press a button.');
end

% Or wait for a response before continuing, with a timeout for example.
ButtonData = [];
tic
while isempty(ButtonData) && toc < 5
    ButtonData = ButtonCheck;
    % No need for a pause.
    % Each check after the first few usually takes between 0.6 and 1.2 ms. There
    % may be longer exceptions.
end
% Do something with button data.
if ~isempty(ButtonData)
    % Do something with button data.
    fprintf('You pressed button %d, at time %d!', ButtonData(1, :));
else
    fprintf('You didn''t press a button.');
end

% -----------------------------------------------------------------------------
% After task
Datapixx('StopDinLog');
Datapixx('RegWrRd');
Datapixx('Close');

% SetButtonsAndPixelMode('Off'); % Not necessary.

This example shows how to check for responses, or wait for a single response at a specific point in a task. ButtonData has 2 columns: key number and time stamps. It will only contain the responses that are new since the last check, often a single button press. If you wish to know when keys are released as well as when they are pressed, provide false as a second argument when calling SetButtonsAndPixelMode, e.g. (‘Both’, false).

Using the buttons in other programs

We now have a software solution to replace the defective USB interface. Once the projector settings are set as desired (backlight intensity, rear/ceiling, display mode), first run

SetButtonsAndPixelMode('');

with the chosen mode (see previous post), so that responses are sent to the MEG. Then run

ButtonKeyboardDriver;

which is also saved in c:\Toolboxes - so it should already be in Matlab’s path. This “driver” polls the Datapixx every 1.67 ms (600 Hz), and sends corresponding keyboard presses (number keys) to the OS when responses are seen. These are then registered as normal key presses by any program.

This is a continuous loop so it won’t work if you need to run other things in Matlab, unless you open multiple Matlab instances. At this polling rate, this rather inefficient solution still only uses about 7% of one CPU core, so should be acceptable for most situations.

Once finished, stop this “driver” with ctrl-c in Matlab’s command window. It is best to execute the last 3 commands in the file to properly close the connection to the Datapixx. [This should eventually have a simple GUI with a “on/off” button.]

Important

If projector settings are changed with the PyPixx program, the button/pixel mode is likely to also change. It is therefore highly recommended to follow this order of steps to ensure responses are sent to the MEG.

  1. Set up projector settings either with one of the VPixx programs or with Datapixx commands in Matlab (recommended for tasks in Matlab).
  2. Select the desired button/pixel mode and start output to the MEG with SetButtonsAndPixelMode.
  3. Process responses either with ButtonCheck or start the ButtonKeyboardDriver to generate keyboard events.
1 Like

I recently repaired button 3, and I just repaired button 1. Please pay attention and let me know of any further issues with the response pads.

As always, please be careful with the pads! And try to apply the “over/under” coiling technique for the cables to avoid twisting and strain on the optic fibers when coiling or uncoiling.